
Connectors
Microsoft Exchange Online Connector
Connectors in Bloo
Updated 2026-08-17
Overview
Microsoft Exchange Online is a cloud-based email, calendaring, and contact service within Microsoft 365, offering secure and scalable communication for businesses. Using this connector, you can fetch a Message Trace Report, which provides detailed insights into email messages sent and received within your organization. Bloo integrates with Microsoft Exchange Online to collect and monitor these message trace logs in real time.
Prerequisites
To configure the Microsoft Exchange Online Connector, you need:
- A Microsoft account with access to the Azure portal
- Application (client) ID
- Client Secret
- Directory (tenant) ID
Step 1 — Register an Application in Microsoft Entra ID
Sign in to the Microsoft Entra Admin Center.
In the left menu, select Microsoft Entra ID.
Click + Add > App Registration.
Complete the registration form:
- Provide a name for the application.
- Under Supported account types, choose Accounts in this organizational directory only.
- Click Register.
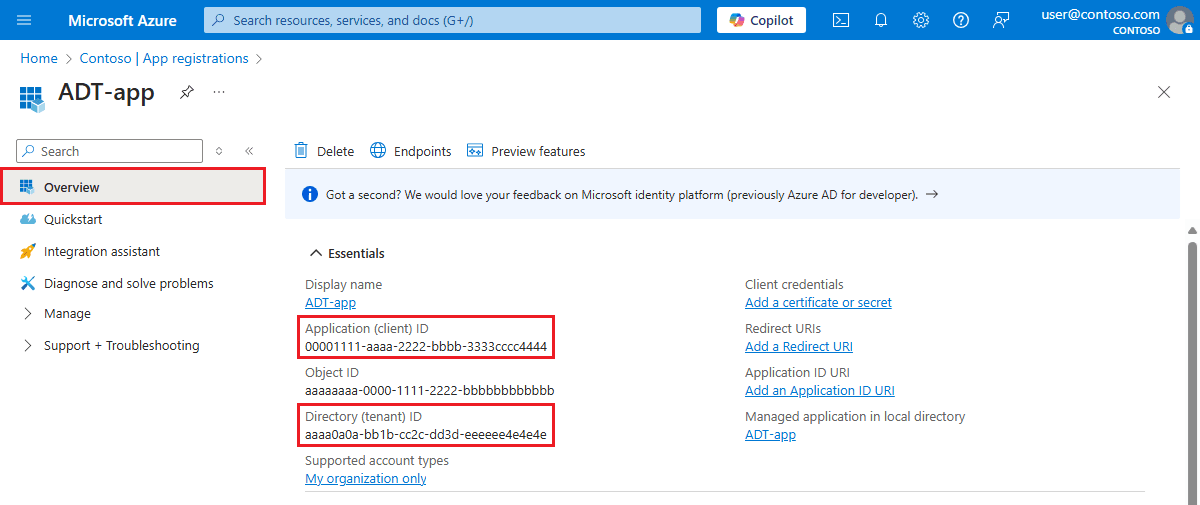
Once registered, copy the Application (client) ID and Directory (tenant) ID from the Overview page. Store both values securely.
Navigate to Certificates & Secrets in the application settings and click New client secret. Provide a description and set an expiry period, then click Add.
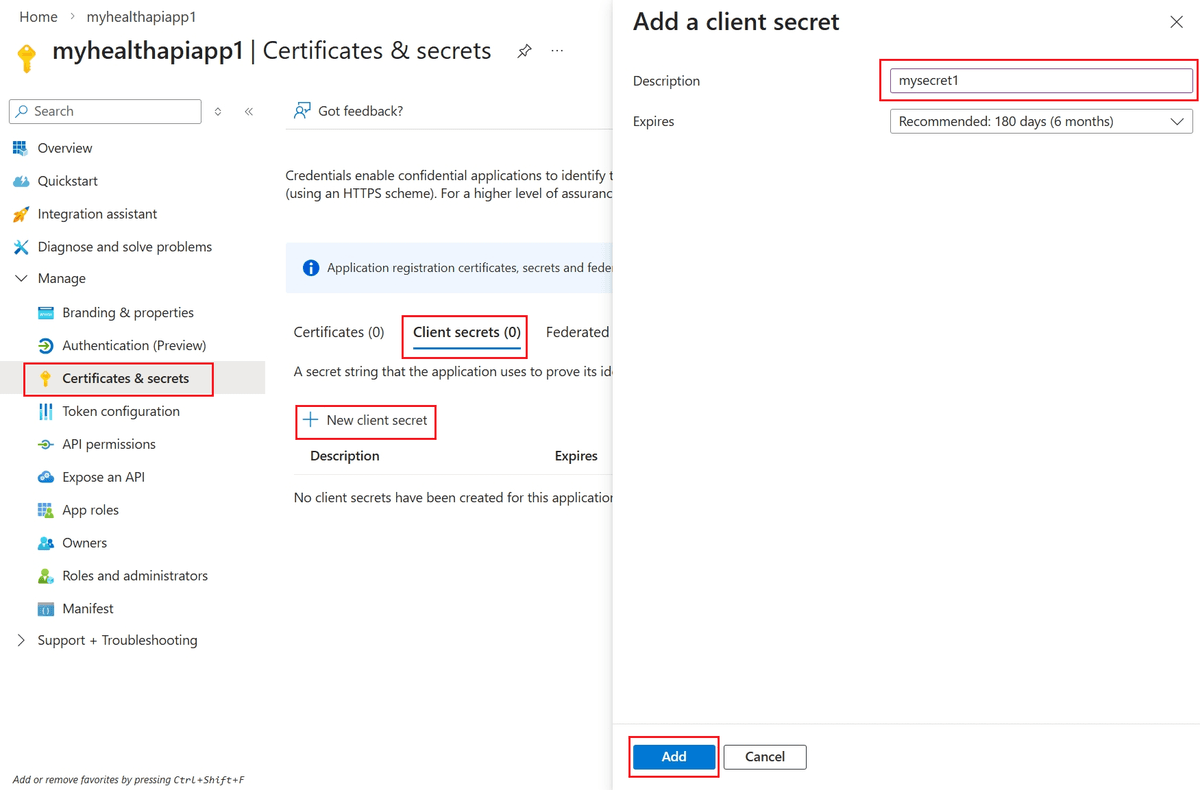
Copy the Client Secret Value and store it securely. You will need it when configuring the connector in Bloo.
Warning Copy the Client Secret Value immediately. It is only visible once — if you navigate away without copying it, you will need to create a new secret.
Step 2 — Assign Azure Roles to Your Application
To enable the connector to access Exchange Trace Logs, assign the Global Reader and Security Reader roles to your Azure application.
Assign the Global Reader Role
Return to the Microsoft Entra ID page.
Click Roles and Administrators in the left menu.
In the search bar, type Global Reader and click the role name (do not check the checkbox next to it).
Click Add assignments, search for your registered application, select it, and click Add.
Assign the Security Reader Role
Go back to Roles and Administrators | All roles.
Search for Security Reader and click the role name.
Click Add assignments, search for your registered application, select it, and click Add.
Step 3 — Grant API Permissions
Your application requires specific API permissions from two sources: Office 365 Exchange Online and Microsoft Graph. Both must be added and granted admin consent before the connector will work.
Office 365 Exchange Online Permissions
Navigate to Microsoft Entra ID → App Registrations and open your registered application.
In the left menu, click API Permissions, then click Add a permission.
In the right panel, click APIs my organization uses and search for Office 365 Exchange Online. Click on the result.
Add the Delegated permission:
- Select Delegated Permissions.
- Search for Reporting, check ReportingWebService.Read, and click Add Permissions.
Add the Application permission:
- Click Add a permission again, select APIs my organization uses, search for Office 365 Exchange Online, and click on it.
- Select Application Permissions.
- Search for Reporting, check ReportingWebService.Read.All, and click Add Permissions.
Summary of Office 365 Exchange Online permissions required:
| Permission | Type | Purpose |
|---|---|---|
| ReportingWebService.Read.All | Application | Read Exchange Online reporting data |
| ReportingWebService.Read | Delegated | Read Exchange Online reporting data on behalf of a user |
Microsoft Graph Permissions
Click Add a permission again. This time select Microsoft Graph from the panel.
Add all Application permissions listed in the table below by selecting Application Permissions, searching for each permission name, checking it, and clicking Add Permissions.
For the Delegated permissions, repeat the same process but select Delegated Permissions instead.
Summary of Microsoft Graph permissions required:
| Permission | Type | Purpose |
|---|---|---|
| SecurityEvents.Read.All | Application | Read security events |
| SecurityEvents.ReadWrite.All | Application | Read and write security events |
| ThreatSubmission.Read.All | Application | Read threat submissions |
| Mail.Read | Application | Read mail in all mailboxes |
| AuditLog.Read.All | Application | Read all audit log data |
| Reports.Read.All | Application | Read all usage reports |
| Reports.Read.All | Delegated | Read usage reports on behalf of a user |
Once all permissions are added, click Grant admin consent for [your tenant] to apply all permissions at once.
Confirm the prompt. Each permission should show a green checkmark confirming consent has been granted.
Note Admin consent must be granted by a Global Administrator. Without it, the connector will not be able to access Exchange Online data even if all permissions are added correctly.
Step 4 — Configure the Microsoft Exchange Online Connector in Bloo
All connector configuration is done from the Datasource page in Bloo.
| Field Name | Description |
|---|---|
| Connector Name | Enter a unique name for the connector. |
| Client ID | Enter the Application (client) ID from the Overview page of your registered app in Microsoft Entra ID. |
| Client Secret | Enter the Client Secret Value retrieved from Certificates & Secrets in your registered app. |
| Tenant ID | Enter the Directory (tenant) ID from the Overview page of your registered app in Microsoft Entra ID. |
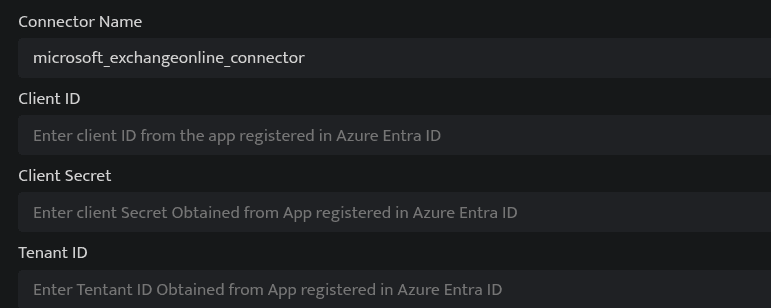
Click Save after entering all the required details.
Bloo will validate the configuration automatically.
Navigate to Collection Status and confirm the connector is listed with a status of Active. This signifies the connector is configured successfully and data is ready to ingest.
Confirmed When the connector appears in Collection Status with status Active, it is configured successfully and data is ready to ingest.
Related Links
Bloo — Collection Status | Bloo — Connector Validation | Exchange Online RBAC for Applications | Bloo — Troubleshooting Connector Validations
Related
Was this page helpful?