
Connectors
Cortex XDR Connector
Connectors in Bloo
Updated 2026-08-17
Overview
Cortex XDR integrates with Bloo using the Cortex XDR Connector. Cortex XDR is a detection and response app that natively integrates network, endpoint, and cloud data to stop sophisticated attacks. It accurately detects threats with behavioral analytics and reveals root causes to speed up investigations.
Using this connector, you can seamlessly ingest Cortex XDR incident logs into Bloo, enriching your security analytics with threat intelligence and improving overall visibility.
Prerequisites
The following are required before configuring the connector in Bloo:
- FQDN — A unique host and domain name associated with your Cortex XDR tenant. It is assigned to you when you generate your API Key and Key ID.
- API Key — Your unique identifier used as the Authorization:{key} header when making API calls. Available as Advanced or Standard type depending on your security requirements.
- API Key ID — Your unique token used to authenticate the API Key, used as the x-xdr-auth-id:{key_id} header.
Follow Step 1 below to obtain these values. Reference: Cortex XDR API Reference
Step 1 — Obtain Credentials from Cortex XDR
Get your API Key
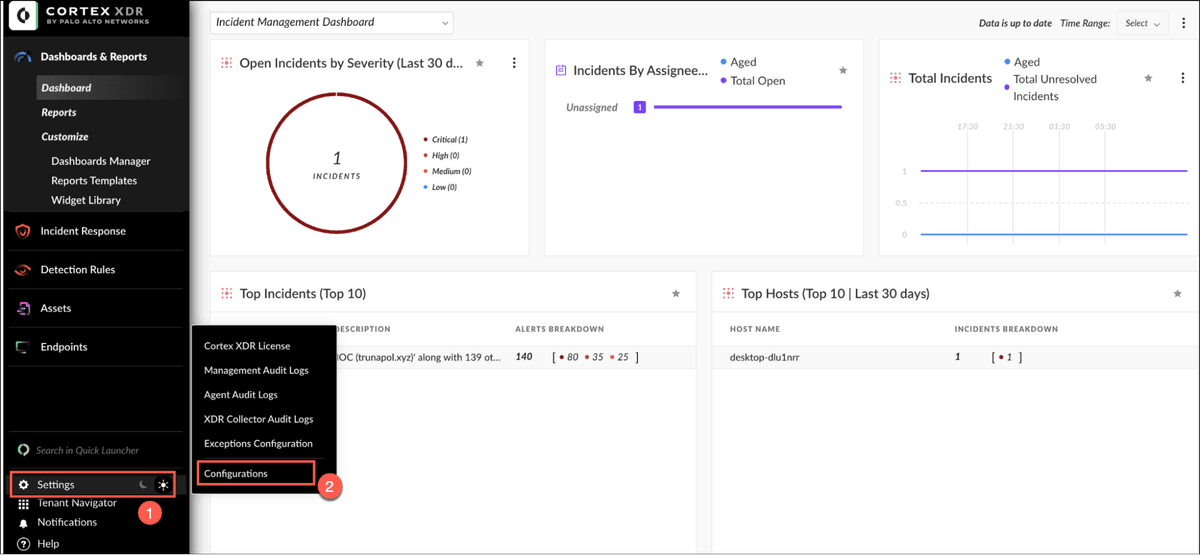
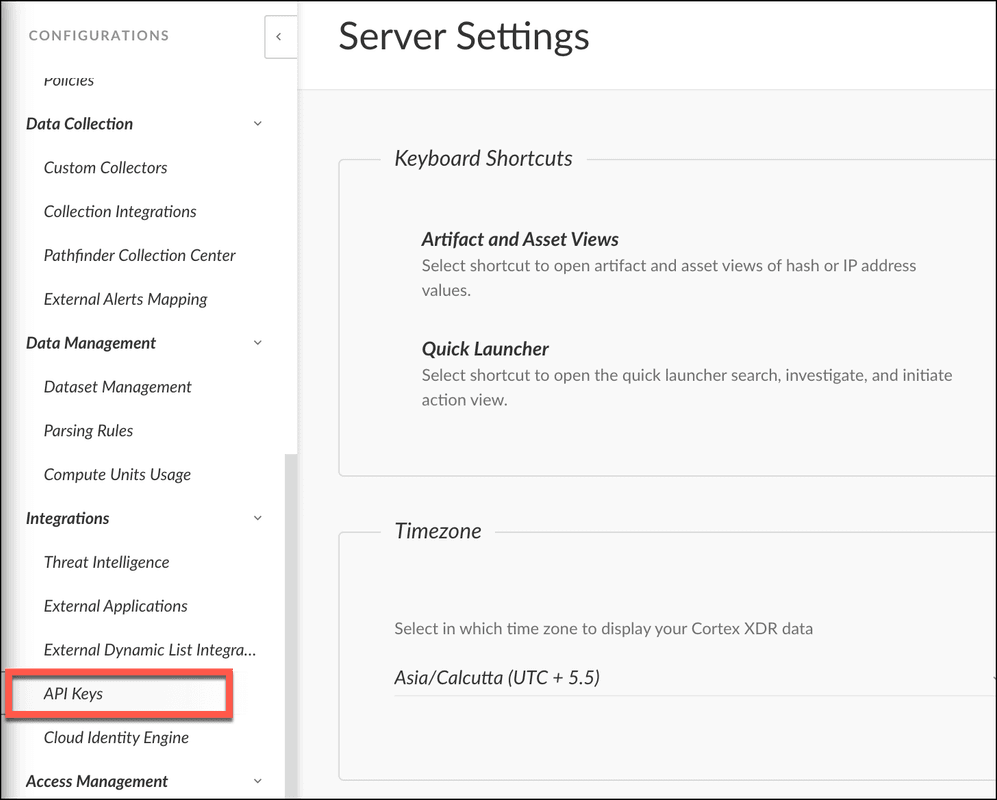
[ Screenshot: Cortex XDR — Settings → Configurations → Integrations → API Keys page ]
- In Cortex XDR, navigate to Settings → Configurations → Integrations → API Keys.
Click + New Key.
Choose the type of API Key — Advanced or Standard — based on your desired security level. If using Advanced, you can optionally enable an expiration date.
Select the desired level of access for this key.
Click Generate. Copy the API Key and then click Done. This value is your Authorization:{key}.
⚠ You will not be able to view the API Key again after this step. Copy it and store it securely before closing this screen.
Get your API Key ID
- In the API Keys table, locate the ID column. Note the ID number corresponding to the key you just created. This is your x-xdr-auth-id:{key_id} token.
Get your FQDN
- In the API Keys table, select your API key and click Copy URL. This is your FQDN.
ℹ Cortex XDR API URIs use the format: https://api-{fqdn}/public_api/v1/{name of api}/{name of call}/. Replace all variables with your unique API Key, API Key ID, and FQDN.
Verify Authentication (Optional)
Before configuring the connector in Bloo, you can verify that your credentials work correctly using a cURL command or Python script.
Standard Key — cURL
curl -X POST https://api-{fqdn}/public_api/v1/{name of api}/{name of call}/ \
-H "x-xdr-auth-id:{key_id}" \
-H "Authorization:{key}" \
-H "Content-Type:application/json" \
-d '{}'Standard Key — Python 3
import requests
def test_standard_authentication(api_key_id, api_key):
headers = {
"x-xdr-auth-id": str(api_key_id),
"Authorization": api_key
}
parameters = {}
res = requests.post(
url="https://api-{fqdn}/public_api/v1/{name of api}/{name of call}",
headers=headers,
json=parameters
)
return resStep 2 — Configure the Cortex XDR Connector in Bloo
All connector configuration is done from the Datasource page in Bloo.
| Field | Description |
|---|---|
| Connector Name | Enter a name for this connector. |
| FQDN | Enter the FQDN obtained from the Cortex XDR API Keys page. |
| API Key | Enter the API Key generated in Step 1. |
| API Key ID | Enter the API Key ID from the ID column in the Cortex XDR API Keys table. |
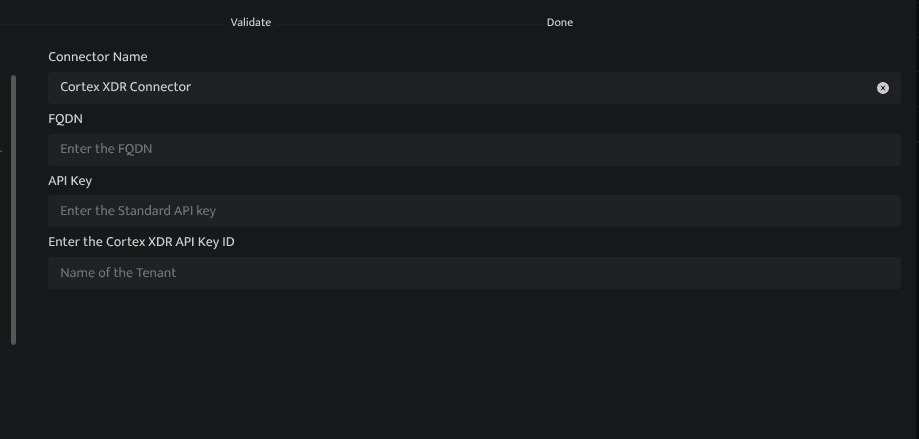
Click Save after entering all the required details.
Bloo will validate the configuration automatically.
Navigate to Collection Status and confirm the connector is listed with a status of Active.
✓ When the connector appears in Collection Status with status Active, it is configured successfully and data is ready to ingest.
Related Links
Bloo — Collection Status | Bloo — Connector Validation | Cortex XDR API Reference
Related
Was this page helpful?