
Connectors
AWS S3 (Optimized) Connector
Connectors in Bloo
Updated 2026-08-17
AWS S3 (Optimized) integrates with Bloo using the pull method via Amazon S3 and Amazon SQS. Instead of scanning your bucket on a schedule, this connector uses S3 event notifications — every time a new log file is written to your S3 bucket, S3 automatically notifies an SQS queue, and Bloo picks it up immediately. This makes it faster and more efficient than the standard S3 connector.
Before You Begin — Prerequisites
You will need the following before starting. Your S3 bucket must already exist and contain the log files you want Bloo to ingest.
| Requirement | Where to Get It | Notes |
|---|---|---|
| AWS Account | Sign in at console.aws.amazon.com | Must have IAM admin access to create users and policies |
| S3 Bucket | AWS Console → S3 | Must already exist. Supported log formats: .json.gz, .log.gz, .txt.gz, .gz, .json, .txt, .log |
| SQS Queue | Created in Step 2 below | Must be a Standard queue in the same region as your S3 bucket. FIFO queues are not supported. |
| SQS Queue URL | AWS Console → SQS → your queue → Details tab | Format: https://sqs.[region].amazonaws.com/[account-id]/[queue-name] |
| Access Key ID | Generated from IAM → Users → Security credentials (Step 1 below) | Created for an IAM user with AmazonS3ReadOnlyAccess policy |
| Secret Access Key | Generated alongside Access Key ID | Shown only once — copy and store securely |
| AWS Region | The region where both your S3 bucket and SQS queue are located | Both must be in the same region. Example: us-east-1 |
Note For reference, see the AWS documentation on Amazon S3 Event Notifications (https://docs.aws.amazon.com/AmazonS3/latest/userguide/EventNotifications.html) and Amazon SQS (https://docs.aws.amazon.com/AWSSimpleQueueService/latest/SQSDeveloperGuide/welcome.html).
Step 1 — Create an IAM User in AWS
Bloo needs an IAM user with read-only access to your S3 bucket. Follow these steps to create one and generate its credentials.
Sign in to the AWS Management Console at
In the search bar, type IAM and select the IAM service.
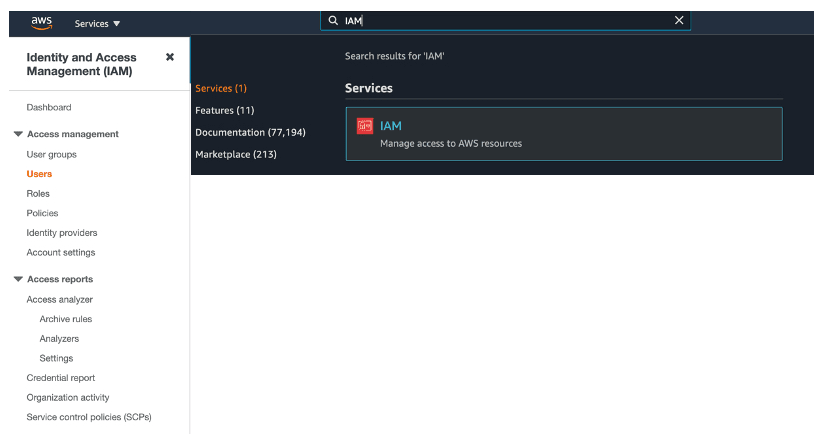
- In the left sidebar, click Users then click Add users.

Enter a username (for example, s3-optimized-bloo-user). On the same screen, look for the Access type section and check the box next to Access key - Programmatic access. Then click Next: Permissions.
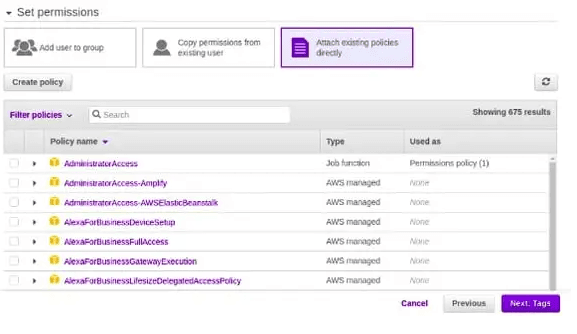
On the Set permissions page, select Attach policies directly, then click Create policy. This opens the policy editor in a new tab.
- In the policy editor, switch to the JSON tab and paste the following policy. This gives Bloo exactly the permissions it needs to read log files from S3 and receive notifications from your SQS queue. Click Next.
{
"Version": "2012-10-17",
"Statement": [
{
"Effect": "Allow",
"Action": [
"sqs:DeleteMessage",
"s3:GetObject",
"sqs:ListQueues",
"sqs:GetQueueUrl",
"sqs:ReceiveMessage",
"sqs:GetQueueAttributes",
"s3:ListBucket"
],
"Resource": "*"
}
]
}Note These are the minimum permissions Bloo needs: s3:GetObject and s3:ListBucket to read log files, and the SQS permissions to receive and delete notifications from the queue.
Enter a name for the policy (for example, BlooS3OptimizedPolicy) and click Create policy. Return to the user creation tab.
Back on the Set permissions page, refresh the policy list and search for the policy you just created (BlooS3OptimizedPolicy). Check the box next to it to select it. Click Next: Tags — you can skip tags — then click Next: Review, then click Create user.
You will now see a confirmation screen showing your Access Key ID and Secret Access Key. Click Show next to the Secret Access Key to reveal it and copy it, or click Download .csv file to save both values to your computer. You will need both to configure Bloo.
Warning The Secret Access Key is shown only once. Download the .csv file now or copy it immediately — you cannot retrieve it again after leaving this screen.
Step 2 — Create an SQS Queue
Next, create an SQS queue. Think of this as a mailbox — every time a new log file lands in your S3 bucket, S3 drops a notification into this queue, and Bloo reads it to know which files to collect.
Open the Amazon SQS console at
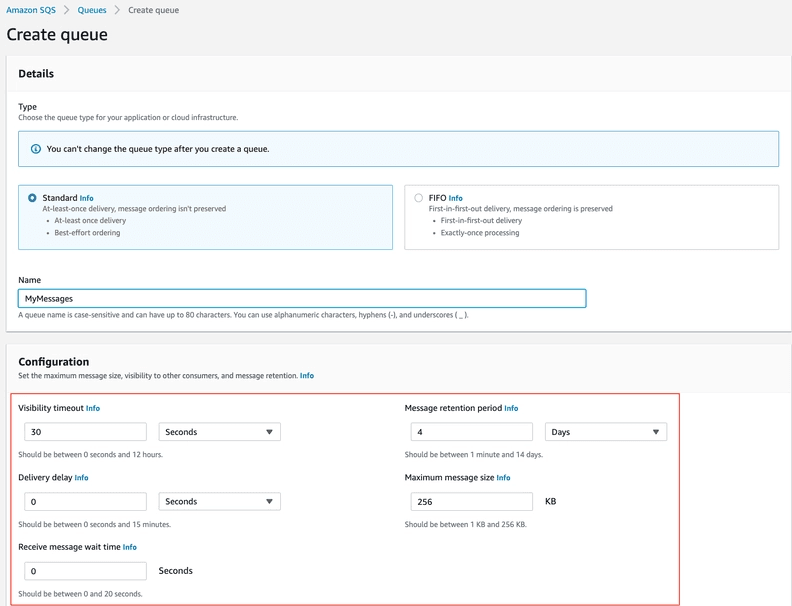
Click Create queue. On the Create queue page, select the correct region — it must be the same region as your S3 bucket. The Standard queue type is selected by default. Leave it as Standard — do not change it to FIFO. Enter a name for your queue (for example, bloo-s3-notifications) and click Create queue.
Open the queue you just created from the Queues list. Click the Access policy tab, then click Edit.
Replace the entire access policy with the following JSON. Update the three values with your own: the SQS queue ARN, your S3 bucket name, and your AWS account ID. Then click Save.
{
"Version": "2012-10-17",
"Id": "example-ID",
"Statement": [{
"Sid": "example-statement-ID",
"Effect": "Allow",
"Principal": { "Service": "s3.amazonaws.com" },
"Action": [ "SQS:SendMessage" ],
"Resource": "SQS-queue-ARN",
"Condition": {
"ArnLike": { "aws:SourceArn": "arn:aws:s3:*:*:awsexamplebucket1" },
"StringEquals": { "aws:SourceAccount": "bucket-owner-account-id" }
}
}]
}Note To find your SQS Queue ARN: go to the queue details page and copy the ARN from the Details tab at the top. To find your Account ID: click your account name in the top right corner of the AWS Console.
- Copy the Queue URL from the queue details page. You will need this to configure Bloo. It looks like: arn:aws:sqs:aws-region:account-id:_queue-name.
Step 3 — Configure S3 Event Notifications
Now tell your S3 bucket to send notifications to the SQS queue whenever a new log file is created.
Open the Amazon S3 console at
Click your bucket name from the list, then click the Properties tab.
Scroll down to the Event notifications section and click Create event notification.
Fill in the event notification form:
- Enter a name for the notification (for example, bloo-log-notifications).
- Under Event types, select All object create events — this triggers a notification every time a new log file is written to the bucket.
- Under Destination, select SQS queue and choose the queue you created in Step 2.
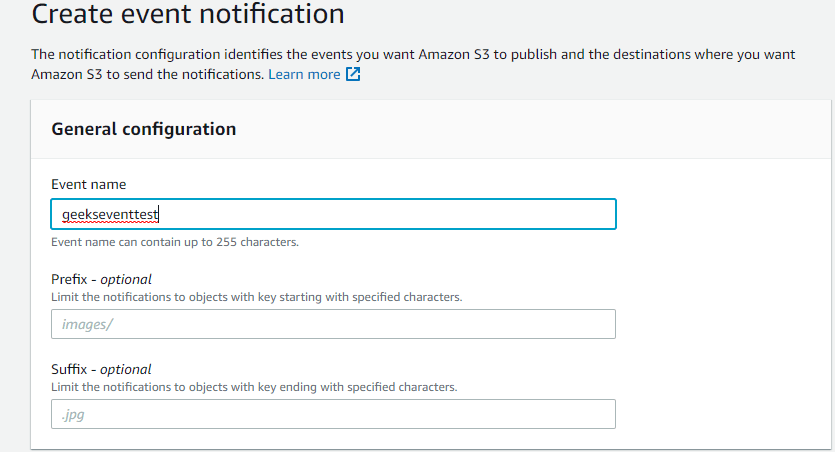
- Click Save changes. Amazon S3 sends a test message to your SQS queue to confirm the connection is working.
Step 4 — Configure the Connector in Bloo
With your credentials and SQS Queue URL ready, set up the connector on the Datasource page in Bloo.
In Bloo, navigate to the Datasource page and click Add Datasource.
Search for and select AWS S3 (Optimized).
Fill in the configuration fields as described below.
| Field | Description | Example |
|---|---|---|
| Connector Name | A unique display name for this connector instance in Bloo. | AWSS3Opt-Prod |
| SQS Queue URL | Enter the Queue URL copied in Step 2. | https://sqs.us-east-1.amazonaws.com/123456789012/bloo-s3-notifications |
| Access Key ID | Enter the Access Key ID generated in Step 1. | Paste from Step 1 |
| Secret Access Key | Enter the Secret Access Key generated in Step 1. | Paste from Step 1 |
| Region | Enter the AWS region where both your S3 bucket and SQS queue are located. | us-east-1 |
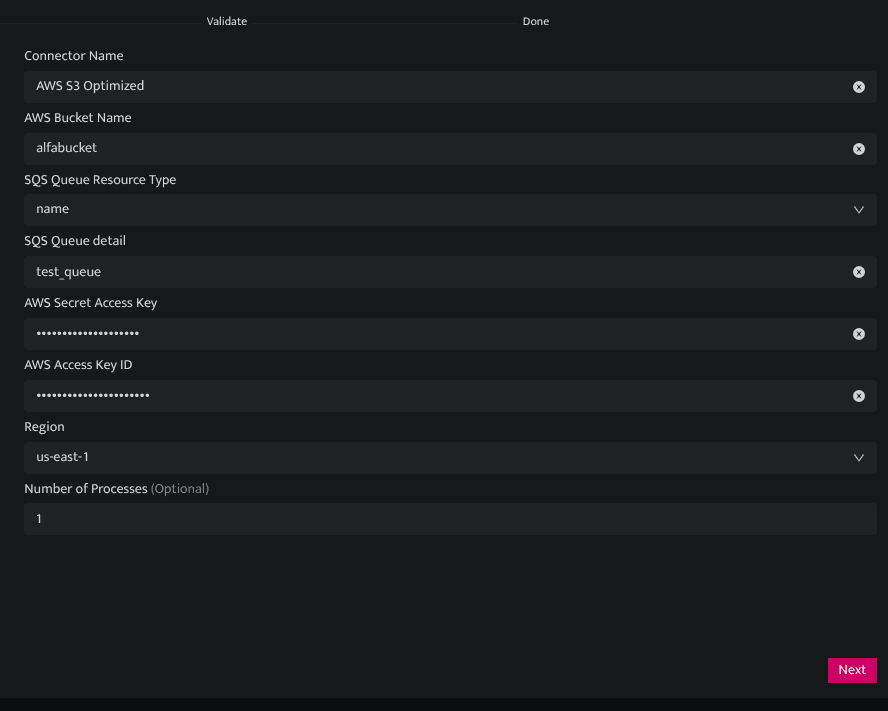
- Click Save. The connector proceeds directly to validation.
Confirmed Go to Collection Status (https://dnif.it/kb/operations/collection-status/) in Bloo and verify the AWS S3 (Optimized) connector shows status Active.
Related: How to Configure Connectors Collection Status AWS S3 Connector
Related
Was this page helpful?